Add Renter Individually
Quickly add individual or multiple renters to your BizBoxCenter account with our straightforward step-by-step guide.
1. Open BizBoxCenter web application from your device.
2. Tap ‘Renter’ at the bottom of your screen to start.
3. Press the ‘+’ button to begin adding a new renter.
– For Individual Addition: This option is great if you’re adding renters one at a time.
-
Enter Details: Fill in the renter’s information in the provided form.
-
Save: After entering the details, make sure to click ‘Save’ to add the renter to your system.
– For Adding Multiple Renters:
-
If you wish to upload data for all your customers at once, consider using the ‘Add Multiple Renters’ option. This involves exporting data from PostalMate in CSV format. For detailed instructions on how to do this, click on this link.

Additional Information:
Viewing the Added Renter List:
The ‘Renter’ page provides a comprehensive list of all registered renters, allowing mail center staff to quickly find and reference renter information.

Editing Entries:
To make any amendments, click ‘Edit’ adjacent to the renter’s entry. Be aware that specific details, including the assigned date, time, and renter ID, are locked after entry to preserve the accuracy of the records.
Editing Item (Mail/Package) Entries
To edit an entry, simply click the ‘Edit’ option, which you’ll find under the more icon (three dots) on the mail detail page. It’s important to note that certain details, such as the assigned date, time, and mail ID, are fixed post-upload to maintain record integrity.

Viewing the Uploaded Item (Mail/Package) List
All uploaded mail and package items are neatly organized on the ‘Mailroom’ page, ensuring mail center staff can easily access and refer to these records when needed.
1. Open BizBoxCenter web application from your device.
2. Tap ‘Mailroom’ at the bottom of your screen to see the mail and/or package list.

Editing Renter Entries
To make any amendments, click ‘Edit’ adjacent to the renter’s entry. Be aware that specific details, including the assigned date, time, and renter ID, are locked after entry to preserve the accuracy of the records.
Viewing the Renter List
The ‘Renter’ page provides a comprehensive list of all registered renters, allowing mail center staff to quickly find and reference renter information.
1. Open the BizBoxCenter web application on your device.
2. Tap ‘Renter‘ at the bottom of your screen to see the renter list.
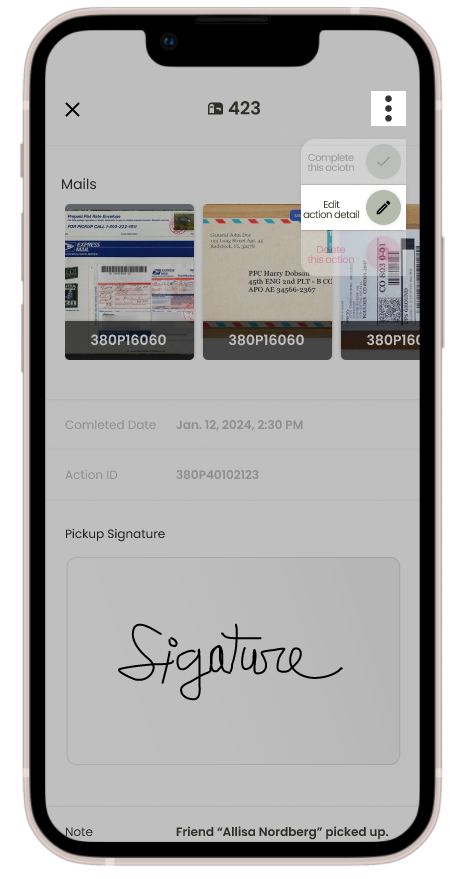
Edit Action (Pick up) Entries
If you need to make changes, simply click the ‘Edit’ option, which you’ll find under the more icon (three dots) on the relevant pickup action detail page.
Please note that some details like the pickup date, time, and signature are not editable to ensure the integrity of the pickup records.
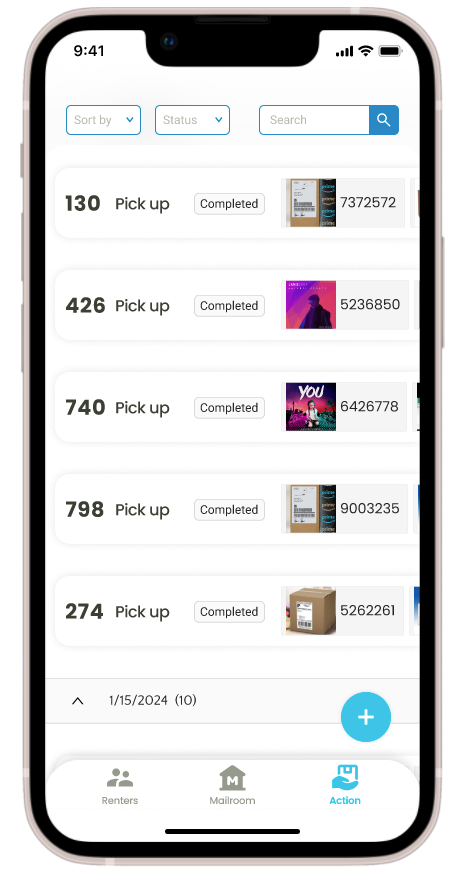
Viewing the Pickup List
All completed pickup actions are listed on the ‘Action’ page for easy access and reference by the mail center staff.
1. Open the BizBoxCenter web application on your device.
2. Tap ‘Action‘ at the bottom of your screen to see the Action(Pickup) List.
Create Pick up
This process is designed to be intuitive and user-friendly, allowing anyone, regardless of their familiarity with computers, to use the product confidently.
CLOSE (Unassign) the Mailbox:
1. Open the BizBoxCenter web application on your device.
2. Tap ‘Action‘ at the bottom of your screen to start.
3. Press the ‘+‘ button to create pickup action.
(Step 1) Identify the Recipient: Select the renter by name or by mailbox number.
(Step 2) Select Items for Pickup: The renter’s associated mail and package items will be displayed. Check these items against the actual packages to confirm they are correct.
(Step 3) Secure Confirmation: Once you’ve verified that the items (packages/mails) match the list.
(Step 4) Get a signature from the renter.
(Step 5) Note Special Instructions: If there are any notes the mail center needs to record, write them down in the “center note” section. Otherwise, you can move on to completing the action.
(Step 6) Finalize the Pickup: Click the ‘Complete‘ button to finish the pickup process.

Additional Information:
Viewing the Pickup List:
All completed pickup actions are listed on the ‘Action’ page for easy access and reference by the mail center staff.

Editing Entries:
If you need to make changes, simply click the ‘Edit’ option, which you’ll find under the more icon (three dots) on the relevant pickup action detail page.
Please note that some details like the pickup date, time, and signature are not editable to ensure the integrity of the pickup records.

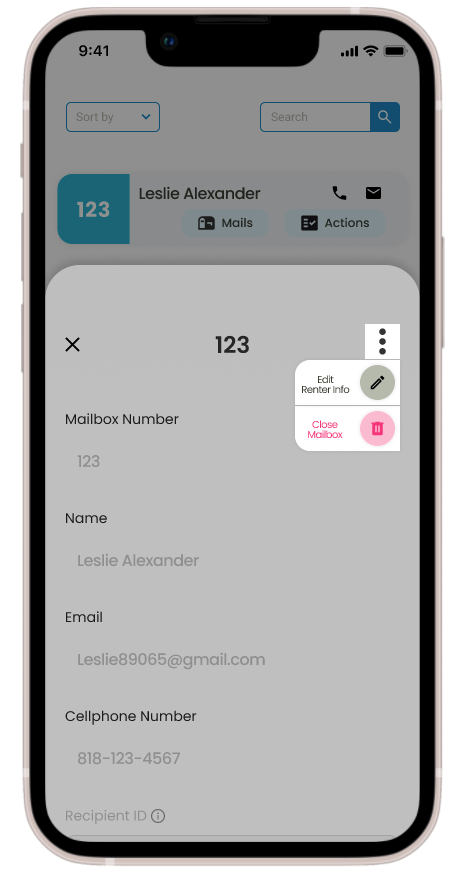
Closing a Renter’s Mailbox
When a customer’s mailbox is no longer in use, it’s crucial to ensure it is fully closed to prevent any unnecessary charges. Here’s how to do it:
CLOSE (Unassign) the Mailbox:
1. Open the BizBoxCenter web application on your device.
2. Tap ‘Renter‘ at the bottom of your screen to start.
3. Click the related renter from the list.
4. Click the ‘Three Dots‘ which is the ‘More’ icon on the top left, then select ‘Close Mailbox‘.
Additional Information:
Viewing the Added Renter List:
The ‘Renter’ page provides a comprehensive list of all registered renters, allowing mail center staff to quickly find and reference renter information.
Editing Entries:
To make any amendments, click ‘Edit’ adjacent to the renter’s entry. Be aware that specific details, including the assigned date, time, and renter ID, are locked after entry to preserve the accuracy of the records.
Upload Mail/Package
Managing your customers’ mail is straightforward with the BizBox Center App. Here’s a simplified guide:
1. Open BizBoxCenter web application from your device.
2. Tap ‘Mailroom’ at the bottom of your screen to start.
3. Press the ‘+’ button to begin adding a new mail item. Here’s how:
– Use Camera (Recommended for Mobile):
- Choose ‘Camera’ – it’s easy for taking new pictures.
- The first time, the app might ask to use your camera. Please allow it.
- Hold your phone above the mail, and press the button to take a picture.
- You can make the picture look nicer by adjusting it. Then, add any extra details about the mail.
- When you’re ready, press ‘UPLOAD’.
– Use Gallery (If You Have a Picture Already):
- Select ‘Gallery’ to use a photo you’ve already taken.
- Pick your photo, add any information about the mail, and then upload it.
– Find Renter (To Choose Who Gets the Mail):
- Use ‘Find Renter’ to pick who the mail is for first.
- You can then take a new photo or use one from your gallery, add details about the mail, and upload it.
Desktop Processing:
The process is similar. Log in, go to ‘Mailroom’, and use the ‘+’ button. You can take photos with your desktop camera or upload from the gallery.
-
Log in to the BizBox Center portal with your credentials.
-
Click Mailroom > + button to manage mail items.
-
Options include:
-
Camera: Use your mobile camera to take a photo of the mail item, adjust as needed, add details, then click UPLOAD.
-
Gallery: Recommended for desktop. Choose a saved photo, add details, and UPLOAD.
-
Find Renter: Begin by selecting a customer, then add mail item photo and details and UPLOAD.
-
Additional Information:
Viewing the Uploaded Item List:
All uploaded mail and package items are neatly organized on the ‘Mailroom’ page, ensuring mail center staff can easily access and refer to these records when needed.
Editing Entries:
To edit an entry, simply click the ‘Edit’ option, which you’ll find under the more icon (three dots) on the mail detail page. It’s important to note that certain details, such as the assigned date, time, and mail ID, are fixed post-upload to maintain record integrity.

Add Multiple Renters
Easily export your data with the “Export CSV from PostalMate” guide, designed to streamline the process of transferring your mailing information into a manageable CSV file format for enhanced efficiency and organization.
Step 1
Export and download the CSV file fro PostalMate. It will automatically open in Excel.

Step 2
The database columns should match the following:
First Name | Last Name | Company Name | Email | Mailbox Number

Step 3
Upload the exported CSV file on step 2 in the “Add Multiple Renters” page.

Export CSV from PostALMate
Easily export your data with the “Export CSV from PostalMate” guide, designed to streamline the process of transferring your mailing information into a manageable CSV file format for enhanced efficiency and organization.
Step 1
In CashMate,
go to Tool → Sales and Marketing Tool → Mailbox Customers.

Step 2
Select “Check All” on the left side.

Step 3
Select “Export Customer Information to Excel” at the bottom.

Step 4
Press the Green Arrow Button next to “Export Customer Information to Excel” at the bottom.

Step 5
Select “Uncheck All” on the left side.

Step 6
Make sure you select “First Name | Last Name | Company Name | Email | Mailbox #”.

Step 7
Click the “Export” button to download the CSV file. It will automatically open in Excel.
Step 8
The database columns should match the following:
First Name | Last Name | Company Name | Email | Mailbox Number
Step 9
Upload the exported CSV file on step 2 in the “Add Multiple Renters” page.
HOW BIZBOX CENTER CHARGES YOU
![]()
At BizBox Center, we believe in transparency when it comes to billing and charges. We want to ensure that you are fully aware of how we charge for our services. Below, we provide a detailed explanation of our billing process to help you understand any associated fees.
Monthly Software Subscription Fee
We offer three different plans to suit your needs:
- Essential Plan: $39 per month
- Standard Plan: $69 per month
- Premium Plan: Charged as contracted per month
Active Mailbox Fee: $0 Unlimited Users
BizBox Center does not charge a fee for this. You can add all your physical mailbox renters at no extra cost. For example, if a mailbox has multiple authorized recipients who want to receive separate notifications, you can provide this service with additional charges to your renters, but no additional fee for you from us. We only charge based on uploads.
Upload Usage Fee
- Basic: 1,000 monthly mail uploads are included
- Additional: $1 per 100 notifications beyond the first 1,000
- Additional usage fees will be added to the next month’s bill.
- For Premium Plan, usage prices will be as contracted.
Scanning Usage Fee
- Basic: 1,000 pages of monthly scanning uploads are included
- Additional: $3 per 100 pages per month after the first 1,000 pages scanned
- Additional usage fees will be added to the next month’s bill.
- For Premium Plan, usage prices will be as contracted.
Credit Card Fee
BizBox Center does not handle the customer collection process. Each company should use its own payment system to charge customers.